6 CLEANING & SEALING HACKS FOR HARDSCAPE PROFESSIONALS
It's Week 2 of our #SummerSealerSeries! And I'm sharing some great hardscape hacks in today's blog post ... because everyone can use a tip or two on how to make their job easier, right?
If you’re a hardscape professional who offers cleaning and sealing services, then this blog post is specifically for you! I'm about to share some invaluable tips I’ve learned along the way that you’re bound to benefit from. Ready for it? Here are my six cleaning/sealing hacks for hardscape professionals!

1. How to dilute efflo cleaner the easy way.
If you’ve ever used Gator Efflorescence Cleaner, then you know it needs to be diluted first. The ideal mixture is four parts water to one part cleaner. Forgot your measuring cup? Not an issue! Measuring out and mixing the proper ratio can be done in as little as three steps! Here’s how:
- Fill a five gallon bucket to the brim with water.
- Take your unopened gallon of Gator Efflorescence Cleaner and plunge it into the bucket. Now watch as a little basic water mechanics takes place! The volume of water that gets displaced will be exactly equal to the volume of the immersed object (a.k.a. the one gallon bottle of efflo cleaner).
- Take the bottle of efflo cleaner back out of the bucket of water, open it up, and pour the liquid in! You will now have the perfect ratio of four gallons of water to one gallon of cleaner!
2. How to clean organic stains in a snap.
Pool Shock. It’s a handy little product that’s not only great for cleaning pools, but for sprucing up dirty pavers, too! Pool Shock is a dry powder (available in 1 lb. bags) and can be found at pretty much any retailer that sells pool supplies. It’s basically a highly concentrated bleach and it’s excellent for stain removal.
Simply mix a half bag of Pool Shock into a five gallon bucket filled with warm water, pour the mixture over any organic stains on your pavers, scrub with a good stiff bristle brush, rinse, and watch them disappear!
3. How to remove that dreaded stain caused by purple primer.
Irrigation contractors often use a purple colored primer when binding the pipes for sprinkler systems. If they happen to drip any of this product on unprotected pavers, removing the purple stain is essentially impossible UNLESS you know this well-kept hack.
Irrigation primer comes in two forms: a purple version (mentioned above) and a clear version. For the most part, the only difference between the two is the dye. To remove a paver stain caused by the purple primer, purchase the clear version of the same formula originally used. Apply the clear primer on top of the purple stain and it will completely fade away over the next 24 hours! (Depending on the severeness of the stain, multiple applications may be necessary.)
4. How to check for moisture.
One key to a successful sealing application is performing the job on completely dry pavers. (Trapped moisture can lead to a very unattractive outcome down the road if you seal over it.) So how can you tell for sure that your pavers are dry? Just tape a small square of Saran Wrap somewhere on the surface you’re about to seal. Step away for about 45 minutes and if there’s no condensation when you come back, you’re good to go!
Moisture is just one of the many things that can negatively impact a sealing job. For more information, read How To Prevent Common Sealer Issues.
5. How to tell if your pavers were previously sealed.
When starting a sealing job on an existing patio, you’ll want to know ahead of time if the pavers were ever sealed before. If the homeowner is uncertain, there is a little trick to finding out on your own! All you need is some efflorescence cleaner. Drop a very small amount on a paver and if it doesn’t fizz, the chances are the surface has been sealed before.
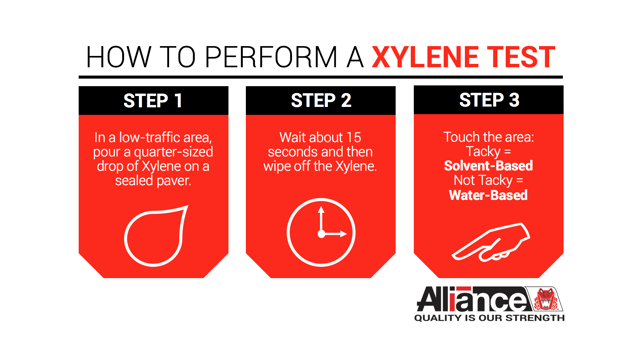
6. How to determine what type of sealer was previously used on your pavers.
If you’re resealing your pavers and are unsure about the type of sealer that was originally used, you’ll want to test the surface. To do this, choose a low-traffic area (i.e. a corner) and pour a quarter-sized drop of Xylene onto a paver. Wait about 15 seconds, wipe off the Xylene, and touch the area. If it feels tacky, it means a solvent-based sealer was probably used. If it’s not tacky, a water-based sealer was probably used.
For more info on this topic, read our blog post Solvent-Based vs. Water-Based Sealers.
Hope you learned some new tricks from this post! If you try any of these hacks on the job, let me know how they worked out for you by leaving some comments. (And if you have other hardscaping hacks, I’d love to hear those, too!)
Looking for a fast and easy online resource that covers all of your questions about sealing concrete pavers? Click here!