10-STEP POLYMERIC SAND INSTALLATION GUIDE
You’ve laid your pavers (and they’re looking mighty fine, if you don’t say so yourself). Now it’s time to tie everything together … literally … with your polymeric sand. Finish the job to perfection by following these ten steps for sand installation.
Update! Alliance's second generation of polymeric sands (G2) can be fully installed in as little as 4 steps. Watch the video below to learn more.
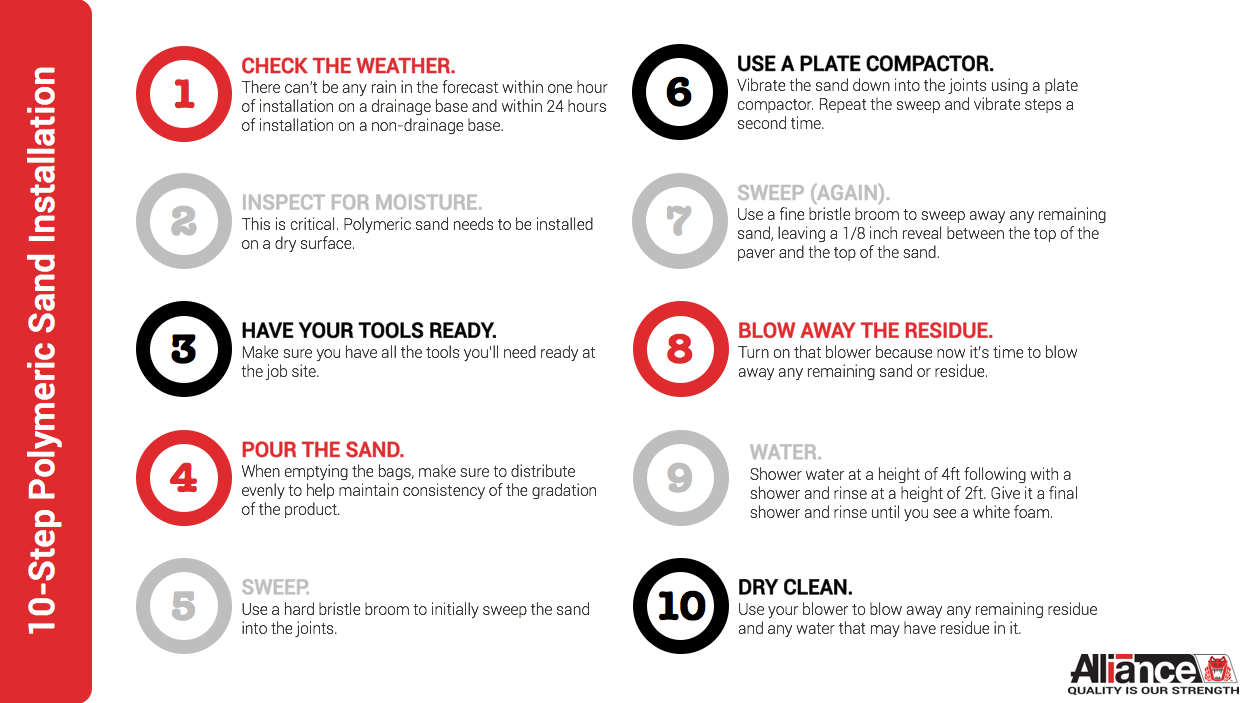
1. Inspect for moisture.
This is critical. Polymeric sand needs to be installed on a dry surface. Make sure there isn’t any dampness prior to diving right in and dumping those bags!
2. Check the weather.
While you hate to see rain in the forecast on a normal day, you’ll hate to see it even more on a sand installation day. In fact, there can’t be any rain in the forecast within one hour of installation on a drainage base and within 24 hours of installation on a non-drainage base. You’ll also want to check that thermometer because polymeric sand should be installed at a temperature of 32∘F or above.
IMPORTANT! If you're using our G2 with Rapid Set Technology, this product is rain safe after only 15 minutes!
3. Have your tools ready.
Make sure you have all the tools you’ll need ready at the job site. You definitely do not want to experience that “Oh No!” moment after the sand has been poured. Check out our blog post “5 Tools Needed for A Polymeric Sand Installation” before getting started.
4. Pour the sand.
Once you’ve prepped the area, perfected the surface, and confirmed it’s dry (of course), you can pour the sand. When emptying the bags, make sure to distribute evenly to help maintain consistency of the gradation of the product.
5. Sweep.
Use a hard bristle broom to initially sweep the sand into the joints.
6. Use the plate compactor.
Next, you’ll vibrate the sand even further down into the joints using a plate compactor. To ensure the joints are fully packed with sand, repeat the sweep and vibrate steps one more time.
7. Sweep (again).
Use a fine bristle broom to sweep away any remaining sand on the job. Remember to leave a 1/8 inch reveal between the top of the paver and the top of the sand.
8. Blow away the residue.
Turn on that blower because now it’s time to blow away any remaining sand or residue.
IMPORTANT! If you're using our G2 Intelligent Polymeric Sand, no blower is required! With G2's special formula, sweeping is all it takes to push the sand off of the paver surface and into the joints. To learn more about this product, click here.
9. Water.
Watering the surface will activate the polymers in the sand. You’ll want to set your hose to the shower setting and shower water at a height of 4ft. Wait no longer than 3-4 minutes and don’t spray too large of an area at once. Important: You should never allow the surface to dry out during the watering process. After your initial showering, you’ll then want to shower and rinse at a height of about 2ft. (again, waiting no longer than 3-4 minutes). Lastly, you’ll want to shower and rinse simultaneously until you see a build-up of white foam or puddles on the pavers. This is when you’ll know to stop.
IMPORTANT! If you're using our G2 Intelligent Polymeric Sand, only one watering is required! G2 is designed to ease and expedite the installation process! To learn more about this product, click here.
10. Dry clean.
Use your blower to blow away any remaining residue and any water that may have residue in it.
Now it’s time to crack your favorite beverage and admire your work!


Installing an outdoor patio or pool surround is a lot of work. So you obviously need to trust the various products being used on the job. When it comes to polymeric sands, Alliance Gator rigorously tests every product to ensure they exceed the expectations of the end-user. See for yourself as Gator sands make their way around the science lab in this quick YouTube video.

